Keras 手写数字识别

1. 普通神经网络 手写数字识别

1
2
3
4
5
6
7
8
9
10
11
12
13
14
15
16
17
18
19
20
21
22
23
24
25
26
27
28
29
30
31
32
33
34
35
36
37
38
39
40
41
42
43
44
45
46
47
48
49
50
51
52
53
54
"""
导包
"""
import matplotlib.pyplot as plt
import numpy as np
from keras.layers import Dense, Activation, Dropout
from keras.models import Sequential
from keras.optimizers import SGD
from tensorflow.examples.tutorials.mnist import input_data
from keras.regularizers import l2
"""
读取数据
"""
mnist = input_data.read_data_sets("./data/mnist/input_data/", one_hot=True)
x_train, y_train = mnist.train.images, mnist.train.labels
x_test, y_test = mnist.test.images, mnist.test.labels

"""
构建网络
"""

model = Sequential([
# 输入784个神经元,输出10个神经元
# bias_initializer='one'初始化偏置为1,activation='softmax'激活函数将输出转为概率
Dense(input_dim=784, units=10, bias_initializer='one', activation='softmax')
])

# 自定义优化器,lr=0.2 学习率
sgd = SGD(lr=0.2)

model.compile(
optimizer=sgd, # 设置优化器
loss='mse', # 设置损失函数,mse是均方误差
metrics=['accuracy'] # 计算准确率
)

"""
训练
"""

# batch_size=32每次取32个样本进行训练。所有样本训练一次将一个周期(epochs),epochs=10指定训练10个周期
model.fit(x_train, y_train, batch_size=32, epochs=10)

"""
评估
"""
# 用模型预测 训练集
loss, accuracy = model.evaluate(x_train, y_train)
print('train loss: ', loss)
print('train accuracy: ', accuracy)
# 用模型预测 测试集
loss, accuracy = model.evaluate(x_test, y_test)
print('test loss: ', loss)
print('test accuracy: ', accuracy)

1.1. 使用交叉熵损失

model.compile之前用的loss函数mse均方误差,现在修改为categorical_crossentropy交叉熵,再训练,你会发现效果稍微好一点

1
2
3
4
5
model.compile(
optimizer=sgd,
loss='categorical_crossentropy', # 设置交叉熵损失函数categorical_crossentropy,
metrics=['accuracy']
)

1.2. 构建多层网络

构建3层,效果更好

1
2
3
4
5
6
7
8
model = Sequential([
# 784 -> 200
Dense(input_dim=784, units=200, bias_initializer='one', activation='tanh'),
# 200 -> 100,"input_dim=200"可以直接省略
Dense(units=100, bias_initializer='one', activation='tanh'),
# 100 -> 10
Dense(units=10, bias_initializer='one', activation='softmax'),
])

结果

1
2
3
4
5
6
55000/55000 [==============================] - 1s 17us/step
train loss: 0.007714528205446814
train accuracy: 0.9985636363636363
10000/10000 [==============================] - 0s 17us/step
test loss: 0.07307906513710914
test accuracy: 0.9797

1.3. 添加Dropout防止过拟合

1
2
3
4
5
6
7
8
9
from keras.layers import Dropout

model = Sequential([
Dense(input_dim=784, units=200, bias_initializer='one', activation='tanh'),
Dropout(0.4), # 失活40%的神经元,防止过拟合
Dense(units=100, bias_initializer='one', activation='tanh'),
Dropout(0.4), # 失活40%的神经元,防止过拟合
Dense(units=10, bias_initializer='one', activation='softmax'),
])

可以看到,加了Dropout,准确率反而下降了。在这个例子中,仅仅是了解一下如何使用Dropout,目的不是为了提高准确率

1
2
3
4
5
6
55000/55000 [==============================] - 1s 18us/step
train loss: 0.07450573552753777
train accuracy: 0.9771818181818182
10000/10000 [==============================] - 0s 20us/step
test loss: 0.10471451835799962
test accuracy: 0.9694

1.4. 正则化防止过拟合

1
2
3
4
5
6
7
from keras.regularizers import l2

model = Sequential([
Dense(input_dim=784, units=200, bias_initializer='one', activation='tanh', kernel_regularizer=l2(0.0003)),
Dense(units=100, bias_initializer='one', activation='tanh', kernel_regularizer=l2(0.0003)),
Dense(units=10, bias_initializer='one', activation='softmax', kernel_regularizer=l2(0.0003)),
])

结果

1
2
3
4
5
6
55000/55000 [==============================] - 1s 18us/step
train loss: 0.13682303088795056
train accuracy: 0.9874181818181819
10000/10000 [==============================] - 0s 19us/step
test loss: 0.16329636447429657
test accuracy: 0.9764

1.5. 使用Adam优化器

1
2
3
4
5
6
7
8
9
from keras.optimizers import Adam

adam = Adam(lr=0.001)

model.compile(
optimizer=adam, # 设置Adam优化器
loss='categorical_crossentropy',
metrics=['accuracy']
)

1.6. 保存和加载模型

在训练完之后,可以保存模型

1
2
3
4
"""
保存模型
"""
model.save("mymodel")

之后可以直接加载模型,进行预测

1
2
3
4
5
6
7
8
9
10
11
12
13
14
15
16
17
18
19
20
21
22
23
24
25
26
27
28
29
30
from keras.models import load_model
from tensorflow.examples.tutorials.mnist import input_data

"""
读取数据
"""
mnist = input_data.read_data_sets("./data/mnist/input_data/", one_hot=True)
x_train, y_train = mnist.train.images, mnist.train.labels
x_test, y_test = mnist.test.images, mnist.test.labels

x_train = x_train.reshape([-1, 28, 28])
x_test = x_test.reshape([-1, 28, 28])


"""
加载模型
"""
model = load_model("mymodel")

"""
评估
"""
# 用模型预测 训练集
loss, accuracy = model.evaluate(x_train, y_train)
print('train loss: ', loss)
print('train accuracy: ', accuracy)
# 用模型预测 测试集
loss, accuracy = model.evaluate(x_test, y_test)
print('test loss: ', loss)
print('test accuracy: ', accuracy)

2. CNN 手写数字识别

1
2
3
4
5
6
7
8
9
10
11
12
13
14
15
16
17
18
19
20
21
22
23
24
25
26
27
28
29
30
31
32
33
34
35
36
37
38
39
40
41
42
43
44
45
46
47
48
49
50
51
52
53
54
55
56
57
58
59
60
61
62
63
64
65
66
67
68
69
70
71
72
73
74
75
76
77
78
79
80
81
82
83
84
85
86
87
88
89
90
91
92
"""
导包
"""
import matplotlib.pyplot as plt
import numpy as np
from keras.layers import Dense, Activation, Dropout, Convolution2D, MaxPool2D, Flatten
from keras.models import Sequential
from keras.optimizers import SGD, Adam
from tensorflow.examples.tutorials.mnist import input_data
from keras.regularizers import l2

"""
读取数据
"""
mnist = input_data.read_data_sets("./data/mnist/input_data/", one_hot=True)
x_train, y_train = mnist.train.images, mnist.train.labels
x_test, y_test = mnist.test.images, mnist.test.labels

# CNN要求数据是4维格式,各维度是 [样本数,图片长,图片宽,通道数]
x_train = x_train.reshape([-1, 28, 28, 1])
x_test = x_test.reshape([-1, 28, 28, 1])

"""
构建网络
"""

model = Sequential([
# 第1个卷积层
Convolution2D(
input_shape=(28, 28, 1), # 输入平面
filters=32, # 卷积核(滤波器)个数
kernel_size=1, # 卷积窗口大小(通道数)
strides=1, # 步长
padding='same', # padding方式
activation='relu' # 激活函数
),
# 第1个池化层
MaxPool2D(
pool_size=2,
strides=2,
padding='same'
),
# 第2个卷积层,不用再设置input_shape,因为经过上一次卷积,平面形状是已知的
Convolution2D(
filters=64,
kernel_size=5,
strides=1,
padding='same',
activation='relu'
),
# 第2个池化层
MaxPool2D(
pool_size=2,
strides=2,
padding='same'
),
# 将第2个池化层的输出结果扁平化为1维
Flatten(),

# 第1个全连接层
Dense(units=1024, activation='relu'),

# Dropout 失活50%的神经元
Dropout(0.5),

# 第2个全连接层,
Dense(units=10, activation='softmax'),
])

adam = Adam(lr=1e-4)
model.compile(
optimizer=adam,
loss='categorical_crossentropy',
metrics=['accuracy']
)

"""
训练
"""
model.fit(x_train, y_train, batch_size=64, epochs=10)

"""
评估
"""
# 用模型预测 训练集
loss, accuracy = model.evaluate(x_train, y_train)
print('train loss: ', loss)
print('train accuracy: ', accuracy)
# 用模型预测 测试集
loss, accuracy = model.evaluate(x_test, y_test)
print('test loss: ', loss)
print('test accuracy: ', accuracy)

结果

1
2
3
4
5
6
55000/55000 [==============================] - 19s 351us/step
train loss: 0.02459700823045251
train accuracy: 0.9924909090909091
10000/10000 [==============================] - 4s 353us/step
test loss: 0.04115021191320848
test accuracy: 0.9863

3. RNN 手写数字识别

1
2
3
4
5
6
7
8
9
10
11
12
13
14
15
16
17
18
19
20
21
22
23
24
25
26
27
28
29
30
31
32
33
34
35
36
37
38
39
40
41
42
43
44
45
46
47
48
49
50
51
52
53
54
55
56
57
58
59
60
61
62
63
64
"""
导包
"""
import matplotlib.pyplot as plt
import numpy as np
from keras.layers import Dense, Activation, Dropout, Convolution2D, MaxPool2D, Flatten
from keras.models import Sequential
from keras.optimizers import SGD, Adam
from tensorflow.examples.tutorials.mnist import input_data
from keras.regularizers import l2
from keras.layers.recurrent import SimpleRNN

"""
读取数据
"""
mnist = input_data.read_data_sets("./data/mnist/input_data/", one_hot=True)
x_train, y_train = mnist.train.images, mnist.train.labels
x_test, y_test = mnist.test.images, mnist.test.labels

# 将图片看作序列化数据。N个样本就是N行数据,每个样本28x28,即每个样本28个序列,每个序列是28个数
x_train = x_train.reshape([-1, 28, 28])
x_test = x_test.reshape([-1, 28, 28])

"""
构建网络
"""

input_size = 28 # 一行有28个像素
time_steps = 28 # 序列(图像)共有28行
cell_size = 50 # 隐藏层神经元数

model = Sequential([
# RNN
SimpleRNN(
units=cell_size,
input_shape=(time_steps, input_size) # 28x28
),
# 全连接层
Dense(units=10, activation='softmax')
])

adam = Adam(lr=1e-4)
model.compile(
optimizer=adam,
loss='categorical_crossentropy',
metrics=['accuracy']
)

"""
训练
"""
model.fit(x_train, y_train, batch_size=64, epochs=10)

"""
评估
"""
# 用模型预测 训练集
loss, accuracy = model.evaluate(x_train, y_train)
print('train loss: ', loss)
print('train accuracy: ', accuracy)
# 用模型预测 测试集
loss, accuracy = model.evaluate(x_test, y_test)
print('test loss: ', loss)
print('test accuracy: ', accuracy)

结果如下,显然RNN不如CNN效果好。CNN多用于处理图像,RNN多用于处理序列式问题,如文本

1
2
3
4
5
6
55000/55000 [==============================] - 2s 45us/step
train loss: 0.33378106603405694
train accuracy: 0.9025636363636363
10000/10000 [==============================] - 0s 40us/step
test loss: 0.3353205518245697
test accuracy: 0.9036
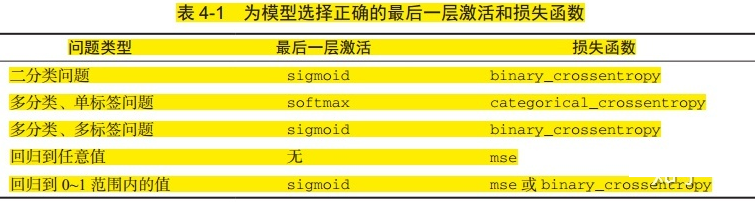
4. 激活函数和损失函数的选择

panchaoxin wechat
关注我的公众号
支持一下