HDFS Java客户端

1. Windows JavaClient环境搭建

1.1. client添加HDFS节点的hostname记录

编辑系统hosts文件,添加以下记录。client请求NameNode操作HDFS时,NameNode会让client根据DataNode的hostname去找DataNode,请求执行相应的操作。如果client不知道DataNode的hostname对应的IP,就无法操作。client可以直接用IP访问NameNode,所以NameNode的hostname记录不一定要有,但是DataNode一定要有

1
2
3
192.168.57.101 hadoop1
192.168.57.102 hadoop2
192.168.57.103 hadoop3

1.2. 导入依赖

添加hadoop-common、hadoop-client、hadoop-hdfs三个依赖,版本与服务器的Hadoop要对应。

1
2
3
4
5
6
7
8
9
10
11
12
13
14
15
16
17
18
19
20
21
22
23
24
25
26
<properties>
<hadoop.version>2.6.5</hadoop.version>
</properties>

<dependencies>
<dependency>
<groupId>junit</groupId>
<artifactId>junit</artifactId>
<version>4.12</version>
</dependency>
<dependency>
<groupId>org.apache.hadoop</groupId>
<artifactId>hadoop-common</artifactId>
<version>${hadoop.version}</version>
</dependency>
<dependency>
<groupId>org.apache.hadoop</groupId>
<artifactId>hadoop-client</artifactId>
<version>${hadoop.version}</version>
</dependency>
<dependency>
<groupId>org.apache.hadoop</groupId>
<artifactId>hadoop-hdfs</artifactId>
<version>${hadoop.version}</version>
</dependency>
</dependencies>

1.3. 添加HDFS配置文件

无论是HDFS Shell还是JavaClient,执行操作时都会读取默认配置文件(core-default.xml、hdfs-default.xml)和自定义配置文件(core-site.xml和hdfs-site.xml)

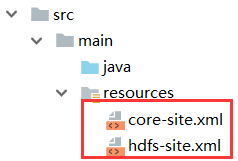
默认配置文件已经存在于依赖的jar包中。所以,只需要将Hadoop服务器的HDFS自定义配置文件(core-site.xml和hdfs-site.xml)复制到 src/main/resources目录下

1.4. 解决HDFS用户权限问题

客户端在操作HDFS时,默认是以执行客户端的系统用户作为操作HDFS的用户

  • Linux中,root用户执行HDFS Shell时,操作HDFS的用户就是root
  • Windows JavaClient执行操作时,操作的用户就是windows当前用户,如Administrator

而HDFS的文件系统和Linux文件系统一样,是有权限的,所以客户端不一定有足够的权限来执行相应的操作。

1
2
3
4
5
6
7
8
9
10
11
$ hdfs dfs -ls -d /     # 查看根目录的ownership和mode
drwxr-xr-x - root root 0 2019-02-24 00:43 /

$ hdfs dfs -ls -R / # 查看所有文件的ownership和mode
-rw-r--r-- 10 root root 115 2019-02-23 23:42 /1.txt
-rw-r--r-- 3 root root 3 2019-02-23 23:35 /2.txt
-rw-r--r-- 3 root root 3 2019-02-23 23:35 /3.txt
-rw-r--r-- 3 root root 199635269 2019-02-23 23:54 /hadoop-2.6.5.tar.gz
drwxr-xr-x - root root 0 2019-02-23 21:30 /input
-rwxr-xr-x 3 root root 280 2019-02-23 21:30 /input/1.txt
-rwxr-xr-x 3 root root 58 2019-02-23 21:30 /input/2.txt

1.4.1. 测试运行 JavaAPI

1
2
3
4
5
6
7
8
9
10
11
12
13
14
15
16
17
18
19
20
21
22
23
24
25
26
public class HdfsClientDemo {
public static final String HDFS_PATH = "hdfs://hadoop1:9000";
FileSystem fs = null;

@Before
public void setUp() throws Exception {
Configuration conf = new Configuration();
fs = FileSystem.get(new URI(HDFS_PATH), conf);
}

@Test
public void testRead() throws Exception {
FileStatus fileStatus = fs.getFileStatus(new Path("/"));
System.out.println(fileStatus);
}

@Test
public void testWrite() throws Exception {
fs.mkdirs(new Path("/demo"));
}

@After
public void tearDown() throws IOException {
fs.close();
}
}

运行 testRead,程序正常执行。运行 testWrite,程序报错:

1
org.apache.hadoop.security.AccessControlException: Permission denied: user=Administrator, access=WRITE, inode="/":root:root:drwxr-xr-x

执行JavaClient的是windows用户Administrator,而HDFS根目录的ownership是root:root,mode是drwxr-xr-x。其它用户有读权限,所以testRead能正常运行。但是其它用户没有写权限,所以执行testWrite就失败了。

1.4.2. 解决方式1:修改所有HDFS文件的所有者或mode(不推荐)

修改HDFS文件的所有者为运行client的windows用户,这样client就能执行写操作了

1
hdfs dfs -chown -R Administrator /

也可以修改HDFS文件的mode,为所有用户添加写权限,也可以直接设置为777,这样所有用户都能执行任何操作了

1
hdfs dfs -chmod -R +w /   # 为所有用户添加写权限

因为涉及文件信息的修改,所以不推荐以上方式

1.4.3. 解决方式2:编辑hdfs.site.xml,不对用户权限进行检测(不推荐)

服务器端编辑hdfs.site.xml,添加以下内容,再给javaclient同步一份。

1
2
3
4
5
<property>
<!-- 不检查用户权限。任何用户可以对HDFS做任何操作 -->
<name>dfs.permissions.enabled</name>
<value>false</value>
</property>

不检查用户权限。任何用户可以对HDFS做任何操作,不安全,所以不推荐这样做。

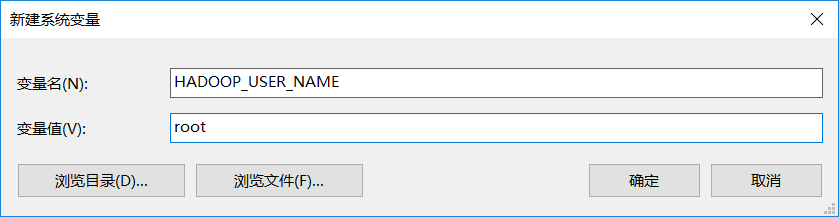
1.4.4. 解决方式3:client配置HADOOP_USER_NAME环境变量(推荐)

client配置HADOOP_USER_NAME环境变量之后,操作HDFS的用户不再是运行client的系统用户了,而是${HADOOP_USER_NAME}。因为现在HDFS上的文件所有者是root,所以配置HADOOP_USER_NAME的值为root。

方式一:添加环境变量

方式二:在JavaClient中添加环境变量

1
2
3
4
5
6
7
@Before
public void setUp() throws Exception {
// 添加环境变量
System.setProperty("HADOOP_USER_NAME", "root");
Configuration conf = new Configuration();
fs = FileSystem.get(new URI(HDFS_PATH), conf);
}

1.4.5. 解决方式4:JavaAPI指定用户名

1
2
3
4
5
6
@Before
public void setUp() throws Exception {
Configuration conf = new Configuration();
// 第3个参数是操作HDFS的用户名
fs = FileSystem.get(new URI(HDFS_PATH), conf, "root");
}

1.5. 配置hadoop-common-bin

运行以下测试程序,第一条语句会出现错误 java.io.IOException: (null) entry in command string: null chmod 0644

1
2
3
4
5
6
7
@Test
public void testCopyToLocalFile() throws IOException {
// 默认useRawLocalFileSystem为false,执行以下语句报错: (null) entry in command string: null chmod 0644
fs.copyToLocalFile(new Path("/1.txt"), new Path("C:/2.txt"));
// 第4个参数是useRawLocalFileSystem,设置为true,才能成功下载到windows磁盘
// fs.copyToLocalFile(false, new Path("/1.txt"), new Path("C:/2.txt"), true);
}

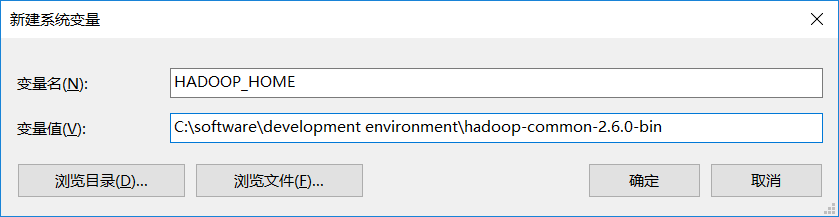
hadoop-common-bin是hadoop在windows环境下编译的,用来在windows下运行hadoop程序的工具。下载大版本号相近的即可:https://github.com/amihalik/hadoop-common-2.6.0-bin

解压后的目录结构如下:

1
2
3
4
5
6
7
8
9
10
11
12
13
14
.
├── bin
│   ├── hadoop.dll
│   ├── hadoop.exp
│   ├── hadoop.iobj
│   ├── hadoop.ipdb
│   ├── hadoop.lib
│   ├── hadoop.pdb
│   ├── libwinutils.lib
│   ├── winutils.exe
│   ├── winutils.iobj
│   ├── winutils.ipdb
│   └── winutils.pdb
└── hadoop.dll

将该目录添加到环境变量中,取名HADOOP_HOME

将bin目录添加到PATH中,因为执行时用到 winutils.exe

1
%HADOOP_HOME%\bin

重启IDE,使IDE能读取到新的环境变量。再次运行testCopyToLocalFile,可以看到useRawLocalFileSystem为false也能成功将HDFS的文件下载到windows本地磁盘。

2. HDFS JavaAPI

2.1. 连接HDFS

连接HDFS只要指定NameNode的地址即可。

方式1:在core-site.xml中预先定义好NameNode的地址fs.defaultFS,或者直接复制服务器端的core-site.xml

1
2
3
4
5
6
@Before
public void setUp() throws Exception {
// Configuration在创建时,会到classpath读取HDFS相关配置文件(core-site.xml、hdfs-site.xml等)
Configuration conf = new Configuration();
fs = FileSystem.get(conf);
}

方式2:通过Configuration的API设置fs.defaultFS

1
2
3
4
5
6
@Before
public void setUp() throws Exception {
Configuration conf = new Configuration();
conf.set("fs.defaultFS", "hdfs://hadoop1:9000");
fs = FileSystem.get(conf);
}

方式3:通过FileSystem.get(URI uri, Configuration conf)得到fs对象,第1个参数是HDFS的URI

1
2
3
4
5
6
public static final String HDFS_PATH = "hdfs://hadoop1:9000";
@Before
public void setUp() throws Exception {
Configuration conf = new Configuration();
fs = FileSystem.get(new URI(HDFS_PATH), conf);
}

无论是哪种方式连接,程序结束时都要记得关闭连接

1
2
3
4
@After
public void tearDown() throws IOException {
fs.close();
}

2.2. mkdirs 创建目录

1
2
3
4
5
6
7
8
9
10
11
12
13
14
@Test
public void testMkdirs() throws Exception {
/*
方法:mkdirs
参数:
f:指定要创建的文件夹路径,可以为相对路径。
permission: 指定创建文件的权限,默认755。
返回值:如果创建成功则返回true;否则返回false。
*/
// 创建目录
fs.mkdirs(new Path("/dirA"));
// 支持递归创建目录
fs.mkdirs(new Path("/dir1/dir2/dir3"));
}

2.3. createNewFile 创建空文件

1
2
3
4
5
6
7
8
9
10
11
12
13
14
15
16
17
18
19
@Test
public void testCreateNewFile() throws IOException {
/*
方法: createNewFile
参数:
f:指定要创建文件的路径,可以为相对路径
返回值: 如果创建成功返回true。否则返回false

在HDFS上创建空文件
若文件存在,则返回false
若文件不存在,则创建并返回true
若文件目录不存在,自动创建目录,再创建文件
*/
boolean result = fs.createNewFile(new Path("/1.txt"));
System.out.println(result);

// 若d1目录不存在,自动创建d1目录,再创建文件
// fs.createNewFile(new Path("/d1/demo.txt"));
}

2.4. append 追加数据

1
2
3
4
5
6
7
8
9
10
11
12
13
14
15
16
17
18
@Test
public void testAppend() throws IOException {
/*
方法: append
参数:
f:指定要写出文件的路径,可以为相对路径。
bufferSize: 缓冲区大小
返回值:如果创建成功获得FSDataOutputStream输出流,否则出现异常信息

错误: could only be replicated to 0 nodes instead of minReplication (=1).
客户端无法与Datanode进行通信。因为客户端为Datanode收到的IP是内部IP而不是公共IP
*/

// 向文件追加数据
FSDataOutputStream fos = fs.append(new Path("/1.txt"));
fos.write("HelloWorld\n".getBytes());
fos.close();
}

2.5. copyFromLocalFile 从本地上传文件

1
2
3
4
5
6
7
8
9
10
11
12
13
@Test
public void testCopyFromLocalFile() throws IOException {
/*
方法:copyFromLocalFile
参数:
delSrc:是否删除本地文件,默认true。
overwrite:当目标文件存在的时候,是否覆盖,默认true。
srcs/src:本地文件,可以指定为数组或者单个文件。
dst:集群存储文件。
返回值:无,如果操作失败,会产生异常信息。
*/
fs.copyFromLocalFile(new Path("C:/1.txt"), new Path("/d1/1.txt"));
}

2.6. copyToLocalFile 下载HDFS文件到本地

1
2
3
4
5
6
7
8
9
10
11
12
@Test
public void testCopyToLocalFile() throws IOException {
/*
参数:
delSrc - whether to delete the src
src - path
dst - path
useRawLocalFileSystem - whether to use RawLocalFileSystem as local file system or not. 若为true,则不会产生crc校验文件,反之会产生
*/
// fs.copyToLocalFile(new Path("/1.txt"), new Path("C:/2.txt"));
fs.copyToLocalFile(false, new Path("/1.txt"), new Path("C:/2.txt"), true);
}

2.7. delete 删除文件或目录

1
2
3
4
5
6
7
8
9
10
11
12
13
14
15
16
17
18
@Test
public void testDelete() throws Exception {
/*
方法: delete
参数
f - 要删除的文件或目录
recursive - 递归删除标志。对于删除文件,该值为true/false无所谓。对于删除目录,表示是否递归删除
返回值:如果文件不存在,则返回false。如果指定recursive为false,而且要删除的文件夹不为空,那么抛出异常,如果删除成功返回true。
其他删除方法:
deleteOnExit: 如果存在则返回true,并标记删除,如果不存在,则返回false。
* */
// 删除1.txt
fs.delete(new Path("/demo.txt"), true);
// 删除空目录dir1
fs.delete(new Path("/dir1"), false);
// 递归删除dir1目录
fs.delete(new Path("/dir1"), true);
}

2.8. rename 从HDFS一个路径移动到另一个路径

1
2
3
4
5
6
7
8
9
@Test
public void testRename() throws Exception {
// 将dir1重命名为dir2
fs.rename(new Path("/dir1"), new Path("/dir2"));
// 移动1.txt
fs.rename(new Path("/1.txt"), new Path("/dir1/1.txt"));
// 移动1.txt,并重命名
fs.rename(new Path("/dir1/1.txt"), new Path("/2.txt"));
}

2.9. exists 判断文件是否存在

1
2
3
4
5
6
@Test
public void testExists() throws Exception {
// 判断1.txt是否存在
boolean exists = fs.exists(new Path("/1.txt"));
System.out.println(exists);
}

2.10. getFileStatus 获取文件属性

1
2
3
4
5
6
7
8
9
10
11
12
13
14
15
16
17
18
19
20
21
22
23
24
25
26
27
28
29
30
31
32
33
34
35
36
37
38
39
@Test
public void testGetFileStatus() throws IOException {
/*
方法:getFileStatus
参数:
f:要获取状态属性指定的文件路径,可以为绝对路径。
返回值:如果获取文件属性成功,则返回FileStatus对象。否则发生异常信息。
其他类似方法:
listStatus: 递归的获取文件属性信息。
*/
FileStatus fileStatus = fs.getFileStatus(new Path("/demo.txt"));
// 获取文件大小(字节)
long len = fileStatus.getLen();
// 获取权限位
FsPermission permission = fileStatus.getPermission();
// 获取所有者
String owner = fileStatus.getOwner();
// 获取所有组
String group = fileStatus.getGroup();
// 获取绝对路径
Path path = fileStatus.getPath();

// 获取最后一次修改的时间戳
long modificationTime = fileStatus.getModificationTime();
// 获取最后一次访问的时间戳
long accessTime = fileStatus.getAccessTime();
// 获取块大小
long blockSize = fileStatus.getBlockSize();

// 判断是不是目录
boolean isDirectory = fileStatus.isDirectory();
// 判断是不是文件
boolean file = fileStatus.isFile();

// 获取副本数
short replication = fileStatus.getReplication();

System.out.println(fileStatus);
}

2.11. listStatus 列出目录下所有文件的属性

1
2
3
4
5
6
7
8
9
10
11
12
13
14
15
16
17
18
19
20
21
22
23
24
25
26
27
28
29
30
@Test
public void testListStatus() throws Exception {
FileStatus[] listStatus = fs.listStatus(new Path("/"));
for (FileStatus fileStatus : listStatus) {
// 获取文件大小(字节)
long len = fileStatus.getLen();
// 获取权限位
FsPermission permission = fileStatus.getPermission();
// 获取所有者
String owner = fileStatus.getOwner();
// 获取所有组
String group = fileStatus.getGroup();
// 获取绝对路径
Path path = fileStatus.getPath();

// 获取最后一次修改的时间戳
long modificationTime = fileStatus.getModificationTime();
// 获取最后一次访问的时间戳
long accessTime = fileStatus.getAccessTime();
// 获取块大小
long blockSize = fileStatus.getBlockSize();

// 判断是不是目录
boolean isDirectory = fileStatus.isDirectory();
// 判断是不是文件
boolean file = fileStatus.isFile();

System.out.println(fileStatus);
}
}

2.12. listFiles 列出目录下所有文件的属性

作用与listStatus()类似

1
2
3
4
5
6
7
8
9
10
11
12
13
14
15
16
17
18
19
20
21
22
23
24
25
26
27
28
29
30
31
32
33
34
35
36
37
38
@Test
public void testListFiles() throws IOException {
RemoteIterator<LocatedFileStatus> iterator = fs.listFiles(new Path("/"), true);
while (iterator.hasNext()) {
LocatedFileStatus fileStatus = iterator.next();
// 获取文件大小(字节)
long len = fileStatus.getLen();
// 获取权限位
FsPermission permission = fileStatus.getPermission();
// 获取所有者
String owner = fileStatus.getOwner();
// 获取所有组
String group = fileStatus.getGroup();
// 获取文件名
String path = fileStatus.getPath().getName();
// 获取最后一次修改的时间戳
long modificationTime = fileStatus.getModificationTime();
// 获取最后一次访问的时间戳
long accessTime = fileStatus.getAccessTime();
// 获取块大小
long blockSize = fileStatus.getBlockSize();
// 判断是不是目录
boolean isDirectory = fileStatus.isDirectory();
// 判断是不是文件
boolean file = fileStatus.isFile();
// 获取副本数
short replication = fileStatus.getReplication();

// 获取各个块副本的位置信息
BlockLocation[] blockLocations = fileStatus.getBlockLocations();
for (BlockLocation blockLocation : blockLocations) {
// 该块在哪些主机上
String[] hosts = blockLocation.getHosts();
System.out.println(Arrays.toString(hosts));
}
System.out.println(path);
}
}

2.13. create 通过IO流上传文件到HDFS

创建文件并写入数据

1
2
3
4
5
6
7
8
9
10
11
12
13
14
15
16
17
18
19
20
21
22
23
24
25
26
27
28
29
@Test
public void testCreate() throws IOException {
/*
方法:create
参数:
f:指定要创建文件的路径,可以为相对路径。
permission:指定文件权限,默认为644(rw-r--r--)。
overwrite: 是否覆盖,默认覆盖。
bufferSize: 进行写过程中缓存区大小,默认4096。
replication: 备份个数,默认3。
blockSize: 块大小,默认128MB。
progress: 进程通知对象,默认为空。
返回值:如果创建成功,返回FSDataOutputStream对象;否则出现异常信息。

*/
// 创建文件并写入数据

FSDataOutputStream fos = fs.create(new Path("/demo.txt"));
BufferedWriter bw = new BufferedWriter(new OutputStreamWriter(fos));
bw.write("你好");
bw.newLine();
bw.close();

// 创建,指定副本数为1(只向一个datanode写入数据)
// FSDataOutputStream fos = fs.create(new Path("/demo.txt"), (short) 1);

// 创建,若文件存在则覆盖
// FSDataOutputStream fos = fs.create(new Path("/demo.txt"), true);
}

可实现文件上传。因为是IO流的形式,所以不限于上传本地文件,也可以是上传其它地方的文件到HDFS

1
2
3
4
5
6
7
8
9
@Test
public void testCreateUpload() throws Exception {
// 创建本地输入流
FileInputStream in = new FileInputStream("E:/1.txt");
// 创建hdfs输出流
FSDataOutputStream out = fs.create(new Path("/dir1/1.txt"));
// 读取本地文件数据,输出到hdfs
IOUtils.copyBytes(in, out, 1024, true);
}

2.14. open 通过IO流下载文件

1
2
3
4
5
6
7
8
9
10
11
12
13
14
15
16
17
18
19
20
21
22
23
@Test
public void testOpen() throws Exception {
/*
方法:open
参数:
f:指定要读取的文件路径,可以为相对路径。
bufferSize: 缓冲区大小。
返回值:如果创建成功获得FSDataInputStream输出流,否则出现异常信息。

*/
// 创建hdfs输入流
FSDataInputStream in = fs.open(new Path("/demo.txt"));

// 读取hdfs数据,输出到控制台
// IOUtils.copyBytes(in, System.out, 1024, true);

// 使用BufferedReader读取
BufferedReader br = new BufferedReader(new InputStreamReader(in));
String line = null;
while ((line = br.readLine()) != null) {
System.out.println(line);
}
}

HDFS JavaClient操作实例

分块下载文件

1
2
3
4
5
6
7
8
9
10
11
12
13
14
15
16
17
18
19
20
21
22
23
24
25
26
27
28
29
30
31
32
33
34
35
36
37
38
39
40
41
42
43
44
45
46
47
48
49
50
51
52
53
54
55
56
57
58
59
60
61
62
63
/**
* 下载第一块
*
* @throws IOException
* @throws InterruptedException
* @throws URISyntaxException
*/
@Test
public void readFileSeek1() throws IOException, InterruptedException, URISyntaxException {

// 1 获取文件系统
Configuration configuration = new Configuration();
FileSystem fs = FileSystem.get(new URI("hdfs://hadoop102:9000"), configuration, "atguigu");

// 2 获取输入流
FSDataInputStream fis = fs.open(new Path("/hadoop-2.7.2.tar.gz"));

// 3 创建输出流
FileOutputStream fos = new FileOutputStream(new File("e:/hadoop-2.7.2.tar.gz.part1"));

// 4 流的拷贝
byte[] buf = new byte[1024];

for (int i = 0; i < 1024 * 128; i++) {
fis.read(buf);
fos.write(buf);
}

// 5关闭资源
IOUtils.closeStream(fis);
IOUtils.closeStream(fos);
fs.close();
}

/**
* 下载第2块
* @throws IOException
* @throws InterruptedException
* @throws URISyntaxException
*/
@Test
public void readFileSeek2() throws IOException, InterruptedException, URISyntaxException {

// 1 获取文件系统
Configuration configuration = new Configuration();
FileSystem fs = FileSystem.get(new URI("hdfs://hadoop102:9000"), configuration, "atguigu");

// 2 打开输入流
FSDataInputStream fis = fs.open(new Path("/hadoop-2.7.2.tar.gz"));

// 3 定位输入数据位置
fis.seek(1024 * 1024 * 128);

// 4 创建输出流
FileOutputStream fos = new FileOutputStream(new File("e:/hadoop-2.7.2.tar.gz.part2"));

// 5 流的对拷
IOUtils.copyBytes(fis, fos, configuration);

// 6 关闭资源
IOUtils.closeStream(fis);
IOUtils.closeStream(fos);
}

对数据进行合并

1
type hadoop-2.7.2.tar.gz.part2 >> hadoop-2.7.2.tar.gz.part1

合并完成后,将hadoop-2.7.2.tar.gz.part1重新命名为hadoop-2.7.2.tar.gz。解压发现该tar包非常完整。

panchaoxin wechat
关注我的公众号
支持一下